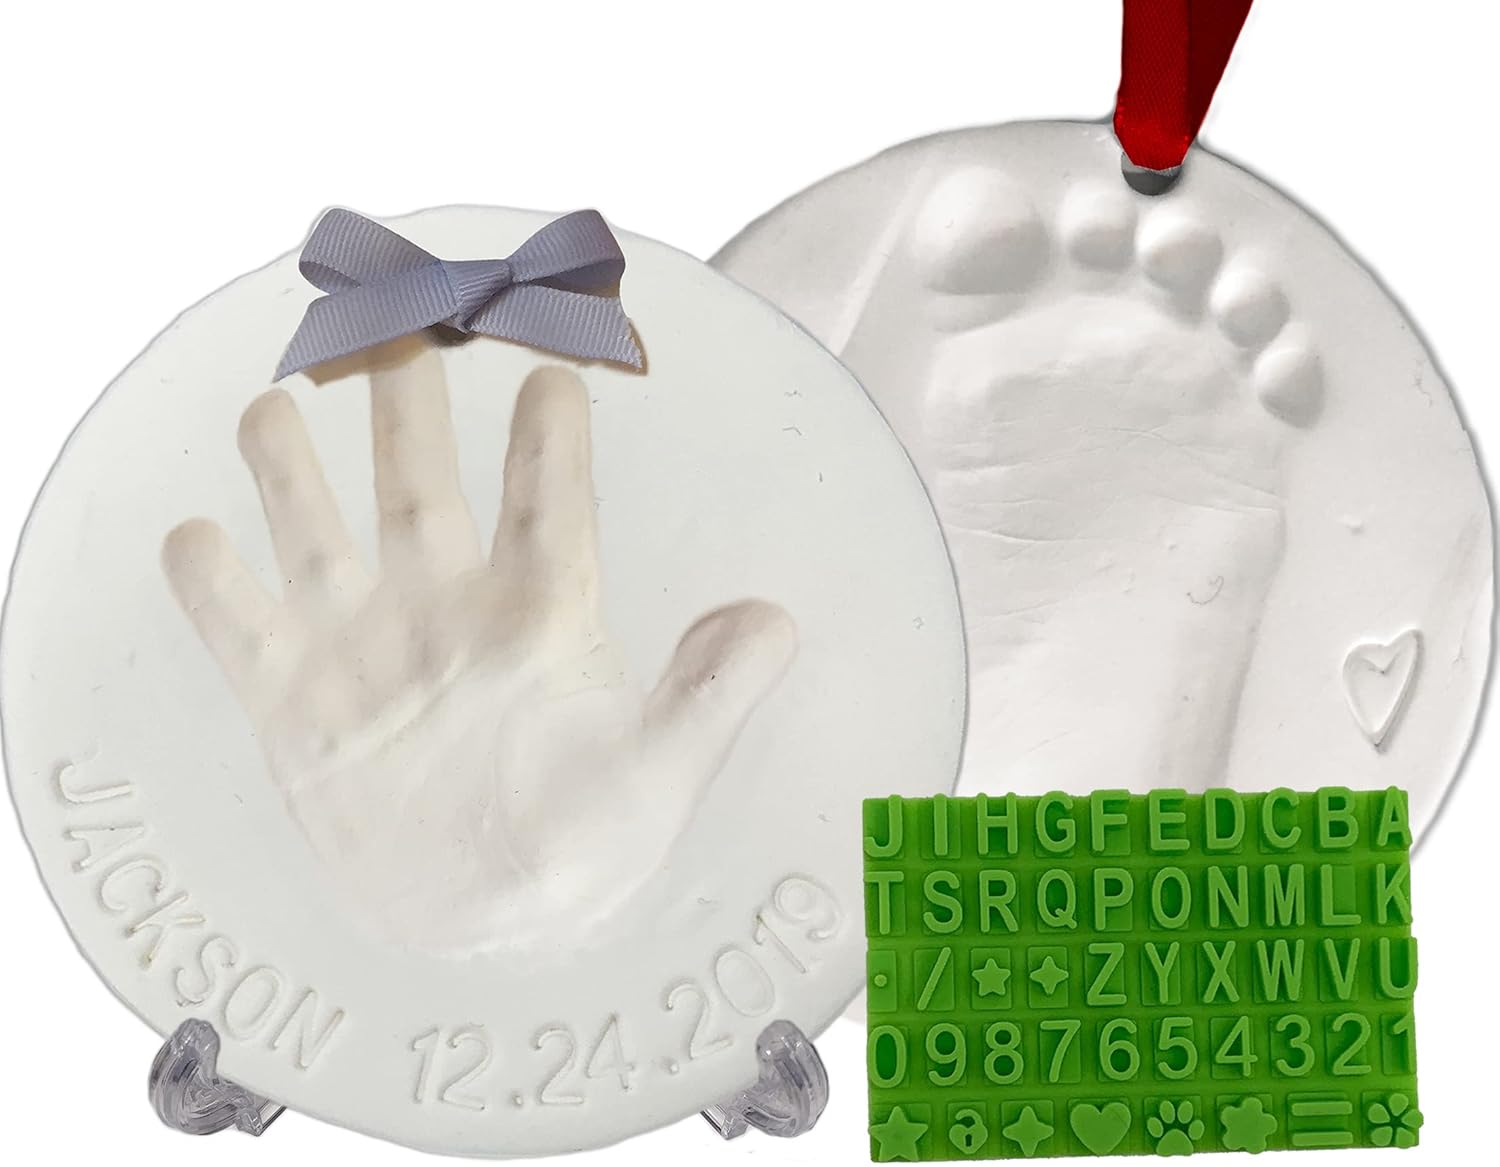


Baby Handprint Footprint Keepsake Ornament Kit (Makes 2) - Bonus Stencil for Personalized Christmas, Newborn, New Mom & Shower Gifts. 2 Easels! Non-Toxic Clay, Air-Dries Light & Soft, Won't Crack.
This is an affiliate link. Buyyyah may earn a commission if you buy through it, at no extra cost to you.
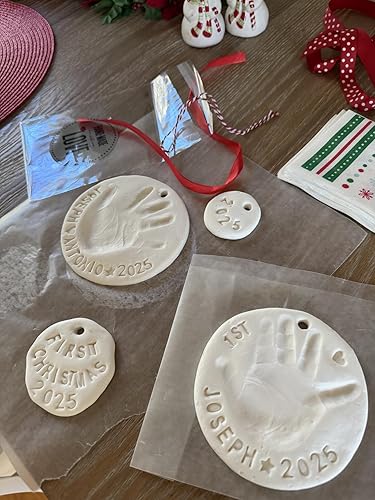
Description
• Most Complete Kit - Everything you need to make beautiful, lasting handprint, footprint or paw print keepsake ornaments to display on your mantel or hang on the Christmas tree. Includes air-dry clay, roller, cutting ring, straw punch, 3 ribbons (red, blue, and pink), bonus customization stencil kit, 2 display stands, simple instructions, and a beautiful gift box! • Bonus Personalization Tool - With letters, numbers and shapes so you can customize and personalize your keepsake ornament with baby's name, birthday, or current date. • Makes 2 Ornaments - Enough clay for two 4.5" ornaments! Perfect for multiple children or pets, twins, hand and foot pair, or to keep one and give one as a gift. Makes a great newborn or baby shower gift, birthday present, Mother's Day, Valentine's Day or Christmas gift. Perfect for new parents, grandparents, and aunts and uncles! • Safe and Easy - No mixing. No baking. Non-toxic air drying clay for simple DIY fun! Dries into a slightly moveable material that's super durable and won't crack like hard clay! • Satisfaction Guaranteed - Includes a lifetime guarantee. Get a perfect print or we'll send you fresh clay. Enjoy a beautiful, lasting keepsake that doesn't crack - yours to cherish forever!
Frequently asked questions
- What comes in the kit?
- It includes air-dry clay, roller, cutting ring, straw punch, 3 ribbons, a bonus customization stencil kit, 2 display stands, simple instructions, and a gift box.
- How many ornaments does it make?
- It makes 2 ornaments and includes enough clay for two 4.5" ornaments.
- Is the clay safe and easy to use?
- Yes. It needs no mixing or baking, and it uses non-toxic air drying clay.
Customer reviews
-

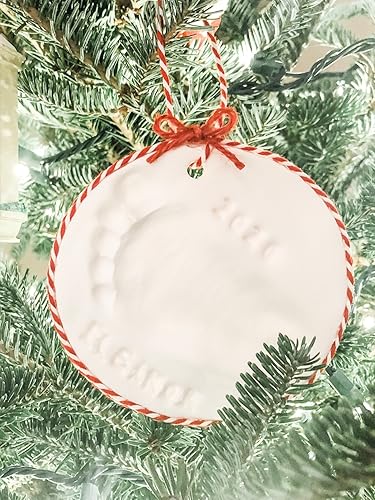
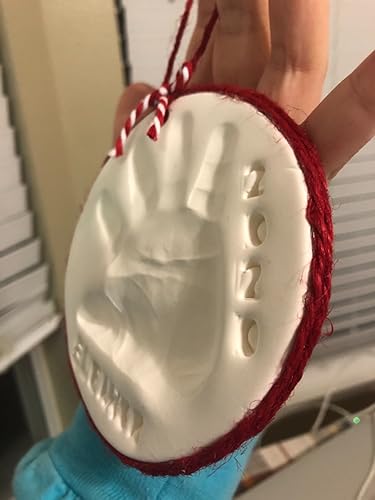
Christmas Ornament Keepsakes I’ll Cherish Forever
Short version: Perfect! Easy, turned out great. Heat for 7 seconds, roll out before using the circle, use a clip board, press hard, use a toothpick, hot glue some ribbon. End result is super lightweight and exactly what I hoped for. If you want more details: Soooo pleased with how these turned out!! I was a bit worried going into it bc there are several options available on Amazon and reviews and results seem to be kind of mixed. I purchased these to make hand and footprint ornaments for my little girl who born in April. She was 7 months when we did these (and her hand and foot especially were almost too big but they still worked great). The foot was the first we did and it took about 3 tries to get it how I wanted it, but it was super easy to redo - just popped it in the microwave for 5-7 seconds. We did 5 initially per the instructions but my hands started getting tired after working on these a while so I upped it to 7 and it helped! We even had to take a break to nurse her and the clay did fine reheating it. Some of the pics from other reviewers show thick chunky looking results and that wasn’t really the look I was going for - especially with it being an ornament I was concerned about the weight. The weight definitely didn’t end up being a problem as this stuff really is super lightweight! I was imagining a hard and heavy ceramic-esque consistency once dried but it reminds me a lot of a marshmallow. When it dries it isn’t hard like ceramic. I could squish it a little between my fingers and it had some bounce to it still but didn’t add any new imprints (if that makes sense). And when I say marshmallow I don’t mean it’s a gooey sticky mess in the middle. This may be typical for all clay like this but I’ve just never used any before now. ANYway - it’s perfect! Light enough to hang on a flimsy branch even and I dare say if it were to fall I don’t think it would break, which is another relief and puts my mind at ease that I can hang them and not need to set them high on a shelf far out of reach for fear of breaking them. As far as the process goes, I mentioned the heating already. I used my own wax paper bc it seemed better quality than what was included. I halved the clay, and then one at a time I heated, kneaded, rolled into a ball, and then used my hand to press it down into approximately the size and thickness I wanted. I then used the rolling pin provided to finish smoothing things out. Lightly laid the circle over it to make sure it was big enough and really just eyeballed the thickness of it and to make sure it was somewhat even throughout (aimed for about 1/3” maybe). I then FLIPPED IT OVER and used the side that had been pressed into the flat countertop the whole time as the side to do the prints on. I did the prints and THEN used the circle cookie cutter like thing to position it how I wanted to trim around it. Side note: Some people have complained about not being able to get the clay smooth - I had no issue doing it this way. I also think some people try and mold and push the clay down into the circle cookie cutter thing provided and then try and roll it out inside there and then talk about how difficult it was and also how big and bulky it was. Yeah that WOULD make it difficult- don’t do that. :) For the prints I also used a clip board to hold the wax paper and clay in one hand and my babe’s foot in the other hand. I’m a labor and delivery/postpartum nurse and this is the method I use for getting newborn footprints to have the most control. :) The last thing I did was add the lettering and the hole for the string (twist the straw to make an easy hole). For the lettering part be sure to cut and organize the letters you need beforehand - it’ll just make the process easier, especially if your clay starts to lose some of its workability. The letters are actually the only part that were sorta difficult. I pressed them into the clay pretty deep bc I wanted to make sure they were still well seen in case some detail was lost during the drying process (same for the hands and feet - push them on it there; it’s not paint prints that you barely have to touch). But it was a little difficult getting the letter back out again. Nothing crazy but had to gently hold the clay down and give them a slight wiggle. And then they kind of drug some of the clay up with them so the edges weren’t “perfect”. I used a toothpick to clean up the edges a bit and am including a video of that part. Then just let it dry. They were definitely fully dry by 72 hours (although I would say they were probably dry by 48 and I was just being extra cautious and was still unsure how hard they were suppose to get). I saw where another reviewer added some ribbon as trim and really liked the idea so I did something similar with some twine and yarn I had. Hot glue worked great and voila! All finished and super pleased. If you read this far, bless you. LOL I hope this was helpful! Merry Christmas!
Short version: Perfect! Easy, turned out great. Heat for 7 seconds, roll out before using the circle, use a clip board, press hard, use a toothpick, hot glue some ribbon. End result is super lightweight and exactly what I hoped for. If you want more details: Soooo pleased with how these turned out!! I was a bit worried going into it bc there are several options available on Amazon and reviews and results seem to be kind of mixed. I purchased these to make hand and footprint ornaments for my little girl who born in April. She was 7 months when we did these (and her hand and foot especially were almost too big but they still worked great). The foot was the first we did and it took about 3 tries to get it how I wanted it, but it was super easy to redo - just popped it in the microwave for 5-7 seconds. We did 5 initially per the instructions but my hands started getting tired after working on these a while so I upped it to 7 and it helped! We even had to take a break to nurse her and the clay did fine reheating it. Some of the pics from other reviewers show thick chunky looking results and that wasn’t really the look I was going for - especially with it being an ornament I was concerned about the weight. The weight definitely didn’t end up being a problem as this stuff really is super lightweight! I was imagining a hard and heavy ceramic-esque consistency once dried but it reminds me a lot of a marshmallow. When it dries it isn’t hard like ceramic. I could squish it a little between my fingers and it had some bounce to it still but didn’t add any new imprints (if that makes sense). And when I say marshmallow I don’t mean it’s a gooey sticky mess in the middle. This may be typical for all clay like this but I’ve just never used any before now. ANYway - it’s perfect! Light enough to hang on a flimsy branch even and I dare say if it were to fall I don’t think it would break, which is another relief and puts my mind at ease that I can hang them and not need to set them high on a shelf far out of reach for fear of breaking them. As far as the process goes, I mentioned the heating already. I used my own wax paper bc it seemed better quality than what was included. I halved the clay, and then one at a time I heated, kneaded, rolled into a ball, and then used my hand to press it down into approximately the size and thickness I wanted. I then used the rolling pin provided to finish smoothing things out. Lightly laid the circle over it to make sure it was big enough and really just eyeballed the thickness of it and to make sure it was somewhat even throughout (aimed for about 1/3” maybe). I then FLIPPED IT OVER and used the side that had been pressed into the flat countertop the whole time as the side to do the prints on. I did the prints and THEN used the circle cookie cutter like thing to position it how I wanted to trim around it. Side note: Some people have complained about not being able to get the clay smooth - I had no issue doing it this way. I also think some people try and mold and push the clay down into the circle cookie cutter thing provided and then try and roll it out inside there and then talk about how difficult it was and also how big and bulky it was. Yeah that WOULD make it difficult- don’t do that. :) For the prints I also used a clip board to hold the wax paper and clay in one hand and my babe’s foot in the other hand. I’m a labor and delivery/postpartum nurse and this is the method I use for getting newborn footprints to have the most control. :) The last thing I did was add the lettering and the hole for the string (twist the straw to make an easy hole). For the lettering part be sure to cut and organize the letters you need beforehand - it’ll just make the process easier, especially if your clay starts to lose some of its workability. The letters are actually the only part that were sorta difficult. I pressed them into the clay pretty deep bc I wanted to make sure they were still well seen in case some detail was lost during the drying process (same for the hands and feet - push them on it there; it’s not paint prints that you barely have to touch). But it was a little difficult getting the letter back out again. Nothing crazy but had to gently hold the clay down and give them a slight wiggle. And then they kind of drug some of the clay up with them so the edges weren’t “perfect”. I used a toothpick to clean up the edges a bit and am including a video of that part. Then just let it dry. They were definitely fully dry by 72 hours (although I would say they were probably dry by 48 and I was just being extra cautious and was still unsure how hard they were suppose to get). I saw where another reviewer added some ribbon as trim and really liked the idea so I did something similar with some twine and yarn I had. Hot glue worked great and voila! All finished and super pleased. If you read this far, bless you. LOL I hope this was helpful! Merry Christmas!


-
Perfect for Newborn Handprint Ornament
Used to make newborn handprint ornaments. Worked great. Is a softer texture (if ur looking for cement hard, this is not it). Letter stamps worked great also. Easy to re-work & fix if you mess up a few times. Tips: - Thinner is better (as the directions state). I did my 1st attempt thicker, thinking the print would be better/deeper & was wrong. It was too thick & I maybe didn’t press hard enough bc the print bounced back & barely left any print behind. Thinner attempt went much better. - Make sure to press pretty firmly. Didn’t have an issue with my NB’s hand in terms of having to press “too” hard. He was fine. - Allow full time to dry. Was still a little pliable after 1 day so I let it dry for a few & was much better.
Used to make newborn handprint ornaments. Worked great. Is a softer texture (if ur looking for cement hard, this is not it). Letter stamps worked great also. Easy to re-work & fix if you mess up a few times. Tips: - Thinner is better (as the directions state). I did my 1st attempt thicker, thinking the print would be better/deeper & was wrong. It was too thick & I maybe didn’t press hard enough bc the print bounced back & barely left any print behind. Thinner attempt went much better. - Make sure to press pretty firmly. Didn’t have an issue with my NB’s hand in terms of having to press “too” hard. He was fine. - Allow full time to dry. Was still a little pliable after 1 day so I let it dry for a few & was much better.
-
Great product! Very intentional and everything included.
Kit included 2 packets of clay and all the tools. I'm an art teacher and used to lots of different clay mediums so I was not intimidated. Clay is wrapped in plastic inside the foil pack. It peels right off and is easy to knead into a ball. (I never heated/microwaved it? That must have been in another review.) Followed all of the directions included and great results. Even had a little leftovers for mini ornaments.
Kit included 2 packets of clay and all the tools. I'm an art teacher and used to lots of different clay mediums so I was not intimidated. Clay is wrapped in plastic inside the foil pack. It peels right off and is easy to knead into a ball. (I never heated/microwaved it? That must have been in another review.) Followed all of the directions included and great results. Even had a little leftovers for mini ornaments.
-
Great keepsake
So easy to use! Hardened quickly! Perfect to preserve little handprints!
So easy to use! Hardened quickly! Perfect to preserve little handprints!